VayuMet User Guide
Everything you need to read India's weather on VayuMet — from your first visit through to advanced layer combinations, sharing, and fixing things when they look wrong.
Start here
Three things most people come for. Each opens straight in the live tool; the guide sections explain the details.
- 1 · Your district Open the 10-day district forecast → Search any of 754 districts for the day-by-day forecast and the advisory for your sector. Section 4.11
- 2 · Warnings See district weather warnings → Heavy rain, thunderstorms, gale winds, heat, cold and fog, ten days ahead, coloured by severity. Section 4.4
- 3 · What is normal Check your district's climate → 1991–2020 rainfall and temperature normals, and how much each district has warmed since 1951.
Going straight to your field? Farming: sowing and spray windows · Aviation: significant-weather dashboard · Wind and solar: resource forecast · Air quality: smog and visibility · Weather markets: Rain Futures desk · Monsoon: monsoon hub
01 Introduction
What this guide covers, who it is written for, and how to move through it.
Purpose of this guide
VayuMet presents a large amount of meteorological data — rainfall, wind, temperature, cloud, aviation reports, hazard alerts, seasonal outlooks, satellite imagery and air quality — on a single interactive map, turns that data into impact-based advisories telling you what the weather will actually do to your sector, and adds a set of focused standalone tools including the Rain Futures Index Desk and the VIMI monsoon index. This guide explains how to operate all of it in a logical order: get in, find your way around, use a feature, then fix problems if they appear.
Every instruction here describes behaviour that is live on the site today. Where a feature is experimental or partially populated, it is labelled as such rather than quietly omitted.
Who this guide is for
General readers
Anyone wanting to know whether it will rain in their district over the next ten days. Start at section 2, then read 4.1.
Pilots & dispatchers
METAR, TAF, SIGMET and significant-weather data. Go straight to section 4.3 and the Aviation Dashboard, then 4.11 for the district aviation advisory.
Farmers & agri-planners
Spray and sowing windows, irrigation balance, soil moisture and seasonal outlooks. See sections 4.11, 4.1 and 4.5.
Researchers & analysts
Model provenance, resolution and update cadence. See sections 5.3 and 6.
Weather-risk & commodity desks
NCDEX RAINMUMBAI and RAINCHNNAI index tracking with 14-day forward projections. Go to section 4.9.
Monsoon watchers
Active and break spells through the semi-permanent features that drive them. See sections 4.5 and 4.10.
How to use this guide
Sections are numbered and ordered by when you are likely to need them. You do not have to read it end to end — the contents list on the left links directly to any subsection, and each section stands on its own.
Panel labels appear in a box and match the on-screen text exactly.
Keys appear as keycaps. Paths and files appear in monospace.
Numbered lists are sequential actions — follow them in order.
▚ End module 1 — introduction
02 Getting Started
Reaching the platform, what your device needs, and what you should see on a successful first load.
VayuMet is entirely open access. There is no account creation, no login screen, no password and no paywall — every map, chart and article is available immediately to anyone who opens the site. As stated in our privacy policy, we do not collect names, email addresses or payment information.
If you were expecting account steps here, that is why they are absent — not an omission from this guide.
2.1 Opening VayuMet
-
Go to the site
Visit www.vayumetweather.com in any modern browser. The interactive forecast map is the home page — nothing further is needed to begin.
-
Wait for the first data load
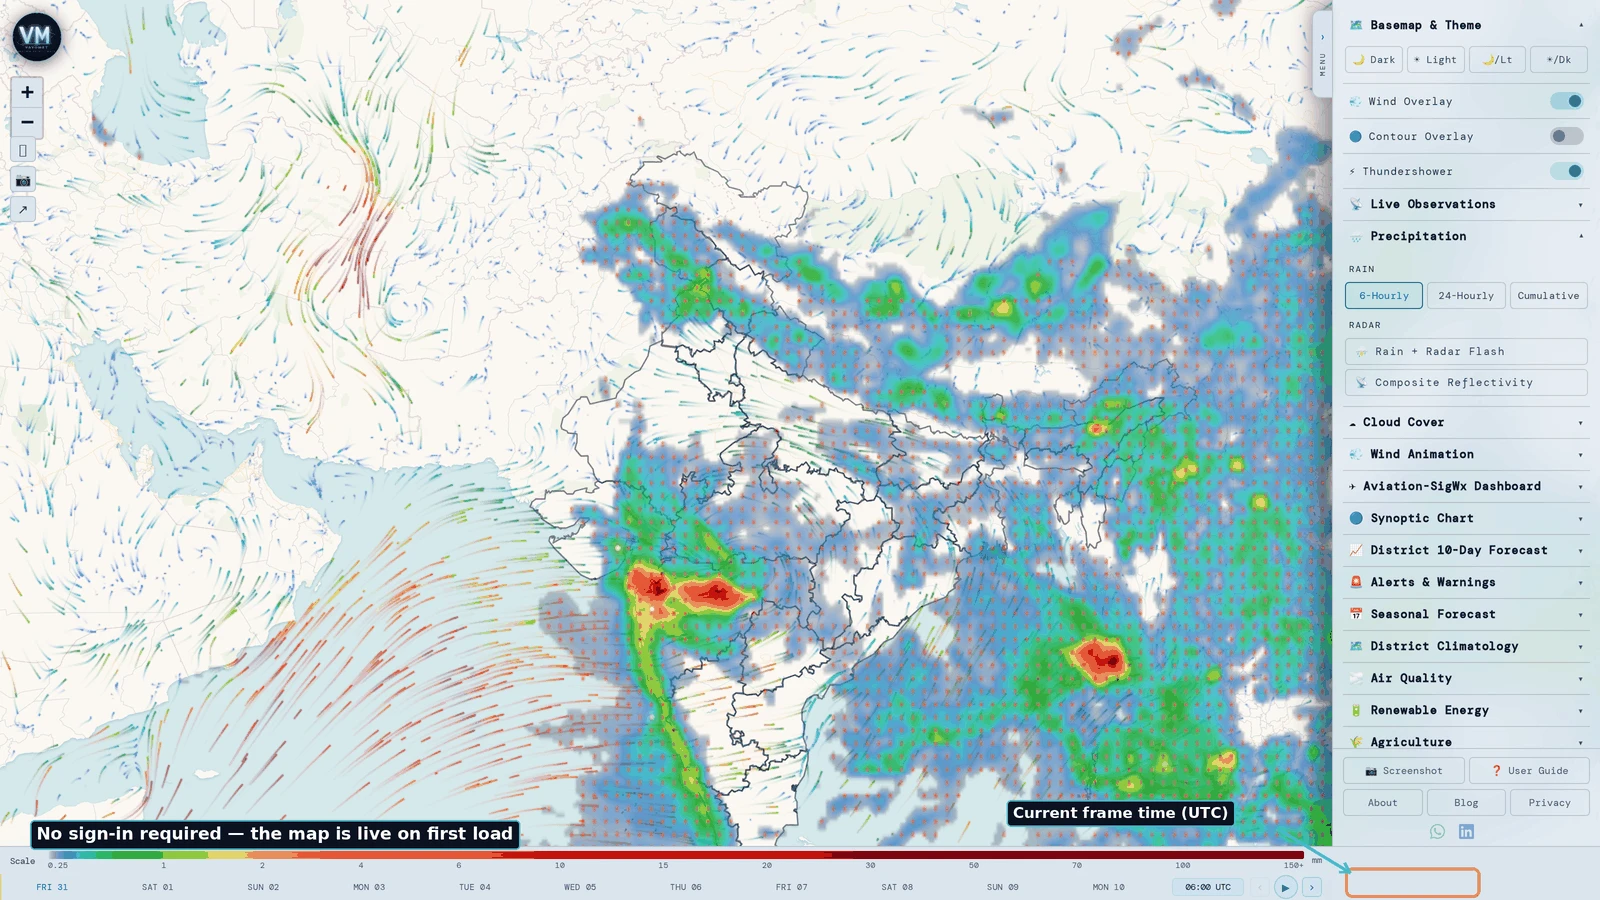
A loading indicator appears while the current model run is fetched. First load takes a few seconds because forecast rasters are decoded in your browser.
-
Check the frame time
The timeline at the bottom shows the valid time of the frame you are looking at, in UTC. Stepping the timeline changes this; it is not the model run time.
2.2 What you need
| Requirement | Recommended | Notes |
|---|---|---|
| Browser | Chrome, Edge, Firefox or Safari — current version | The map uses modern JavaScript and in-browser GeoTIFF decoding. Internet Explorer is not supported. |
| Connection | Broadband or 4G | Forecast rasters and satellite imagery are several MB per layer. |
| Screen | 1280 px wide or more | Works on phones and tablets; the control panel collapses on narrow screens. |
| JavaScript | Enabled | Required — the map cannot render without it. |
| Account | Not applicable | No registration, login or subscription of any kind. |
2.3 Your first map
On a successful load you should see India centred in the map canvas with a default rainfall layer active, a colour legend along the timeline bar, and the control panel available from the right edge.
- Pan and zoom
Drag to pan. Scroll or pinch to zoom. Double-click zooms in one level.
- Open the control panel
Use the tab on the right edge of the map to slide the layer panel open, then closed again when you want the full map.
- Step through time
Use the timeline at the bottom to move forward through the forecast. Section 3.3 covers this in full.
Your theme choice is remembered in your browser between visits, so set it once (section 5.1) and it will persist.
▚ End module 2 — getting started
03 Navigating the Interface
The five regions of the screen, what each control does, and how to move through forecast time.
3.1 Screen anatomy
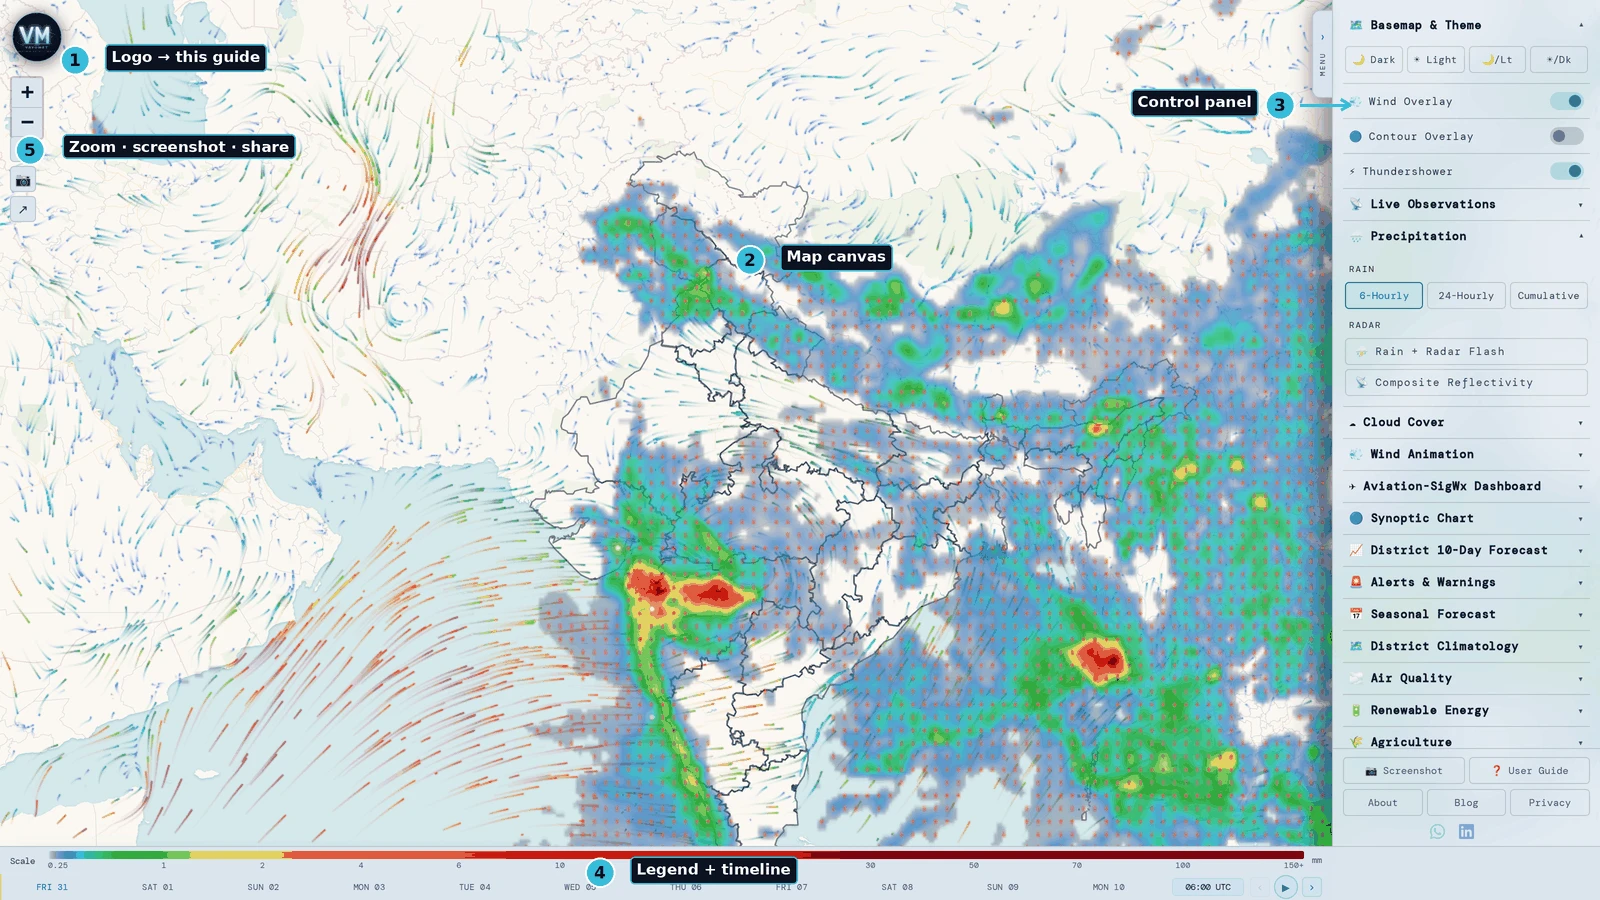
| Region | Location | What it does |
|---|---|---|
| ① Logo | Top-left, floating | The VayuMet mark. Opens this user guide in a new tab. |
| ② Map canvas | Fills the window | The interactive map. Hover features for tooltips; click for detail popups. |
| ③ Control panel | Right edge | All layer selection, basemap choice and overlay toggles. Open by default; collapse it with the MENU tab on its left edge. |
| ④ Legend & timeline | Bottom | Colour legend with units, the day scale, the current frame time in UTC, and playback controls. |
| ⑤ Map actions | Left edge, below zoom | Fullscreen, screenshot and share buttons, stacked under the zoom controls. |
3.2 The control panel
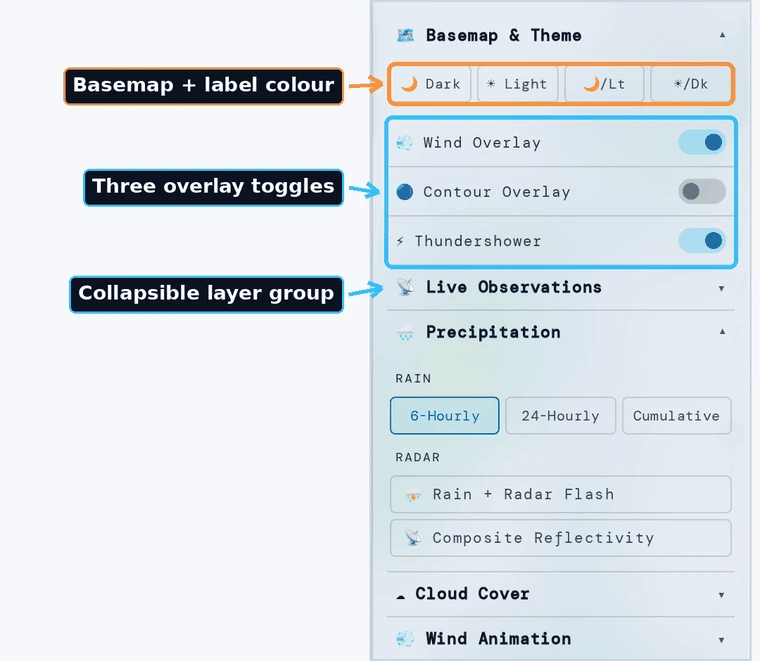
The panel is the primary control surface. It is organised top to bottom as basemap, overlay toggles, then layer groups.
Basemap
Four combinations let you set the map tiles and label colour independently, which matters when a bright raster washes out place names:
| Button | Tiles | Best for |
|---|---|---|
| 🌙 Dark | Dark tiles, light labels | Default. Highest contrast for most colour ramps. |
| ☀ Light | Light tiles, dark labels | Printing, daylight screens, presentations. |
| 🌙/Lt | Dark tiles, dark labels | Pale layers where light labels disappear. |
| ☀/Dk | Light tiles, light labels | Dark, saturated layers over a light base. |
Overlay toggles
Three switches sit directly under the basemap row. These stack on top of whichever main layer is active, so you can combine information rather than switching back and forth:
| Toggle | Adds |
|---|---|
| 💨 Wind Overlay | Animated particle streamlines showing wind flow. On by default. |
| 🔵 Contour Overlay | Pressure contour lines (isobars) with value labels. Off by default. |
| ⚡ Thundershower | Convective-activity markers where the model indicates thunderstorms. On by default. |
Layer groups
Everything below the toggles is a collapsible group — click a heading to expand it. Fourteen groups cover Live Observations, Precipitation, Cloud Cover, Wind Animation, Air Quality, Renewable Energy and Agriculture, alongside headings that link out to the standalone tools in section 4.8. Only one raster layer is active at a time; selecting a new one replaces the last.
These are not toggles — they sit inside the 📡 Live Observations group as selectable layers, along with the Himawari-9 satellite products. Expand that group to reach them.
3.3 Timeline & playback
The main forecast covers 10 days in 41 frames at 6-hour steps. The timeline adapts to the active layer — daily layers step a day at a time, seasonal layers step a month at a time, and live layers hide the scrubber because there is only one current observation.
- Read the current frame
The valid time is displayed above the scrubber. All forecast times are UTC — add 5 hours 30 minutes for IST.
- Step frame by frame
Use the previous and next buttons for precise stepping, or click the track to jump.
- Play the animation
Press play to auto-advance and watch a system move. Press again to pause.
- Use the keyboard
Focus the scrubber, then use the arrow keys and space bar as listed below.
| Key | Action |
|---|---|
| ← → | Step one frame back or forward |
| Space | Play or pause the animation |
| Enter | Activate the focused control |
| Tab | Move focus between controls |
Total Rain · 6h is rain in that 6-hour step only. Total Rain · 24h (Daily) is a daily total. Total Rain · Cumulative is the running total since the run started. Comparing them without noticing the window is the most common misreading of the map.
3.4 Key icons
| Icon | Name | What happens |
|---|---|---|
| ⛶ | Fullscreen | Expands the map to fill the screen. Press again or use Esc to exit. |
| 📷 | Screenshot | Prompts you to use your browser's Print → Save as PDF to capture the current view. |
| ↗ | Share | Opens your device share sheet, or copies the page URL to your clipboard with a confirmation. |
| ◐ | Theme | Switches between dark and light. Remembered for next visit. |
| ⬤ … | Status pill | Replaces the frame time for live layers. Reads ⬤ LIVE for live observations, or ⬤ SAT plus the imagery timestamp for satellite. See section 6 for its error states. |
▚ End module 3 — navigation
04 Using Core Features
Task-based walkthroughs for each layer group, in the order most people need them.
4.1 Rainfall forecast
Goal: find out how much rain a district will get, and when.
- Open the panel and choose a rainfall layer
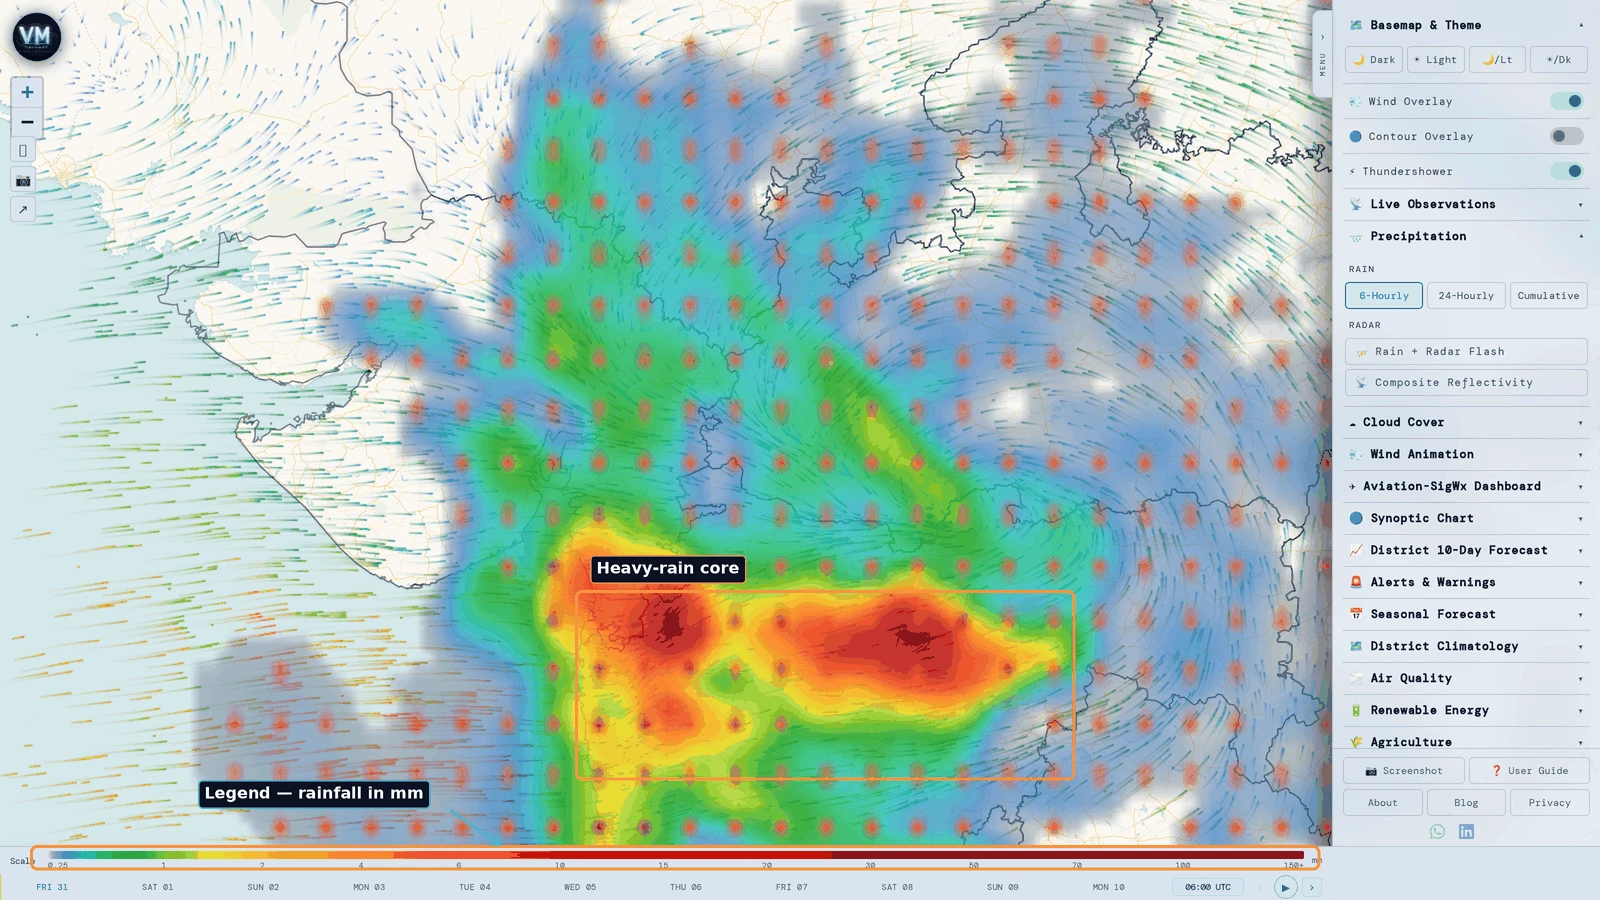
Under the precipitation group, pick Total Rain · 6h for timing detail or Total Rain · 24h (Daily) for daily totals.
- Zoom to your area
Scroll in on your district so the colour bands are clearly separated.
- Read the legend
The colour bar sits above the scrubber with values in millimetres. Deeper colours are heavier rain.
- Step forward in time
Advance frame by frame to see when the rain band arrives and clears.
- Check the total
Switch to Total Rain · Cumulative to see the accumulated storm total rather than any single step.
| Layer | Unit | Use it for |
|---|---|---|
| Total Rain · 6h | mm | Timing — when rain starts and stops |
| Total Rain · 24h (Daily) | mm | Daily totals for planning |
| Total Rain · Cumulative | mm | Event or season-to-date accumulation |
| Rain + Radar Flash | mm | Rainfall with convective flash highlighting |
| Composite Reflectivity | dBZ | Radar-style intensity — storm cores |
4.2 Wind and wind barbs
Goal: see wind speed and direction at the level you care about.
- Pick a level
Choose a wind layer from 10 m (surface) up through 100 m, 850, 500, 300 and 200 hPa.
- Add barbs for direction
Enable the matching barbs layer to overlay direction symbols on the speed field.
- Read the barbs
The staff points into the wind. Each full barb is 10 knots, each half barb 5 knots, and a filled pennant 50 knots.
- Check gusts separately
Wind Gust shows peak gusts, which matter far more than mean wind for damage and aviation.
10 m for surface impact and everyday conditions. 100 m for wind energy. 850 hPa (~1.5 km) for monsoon flow and the low-level jet. 500 hPa (~5.5 km) for steering of systems. 300–200 hPa for the jet stream.
4.3 Aviation weather
Goal: assess flight conditions from live reports.
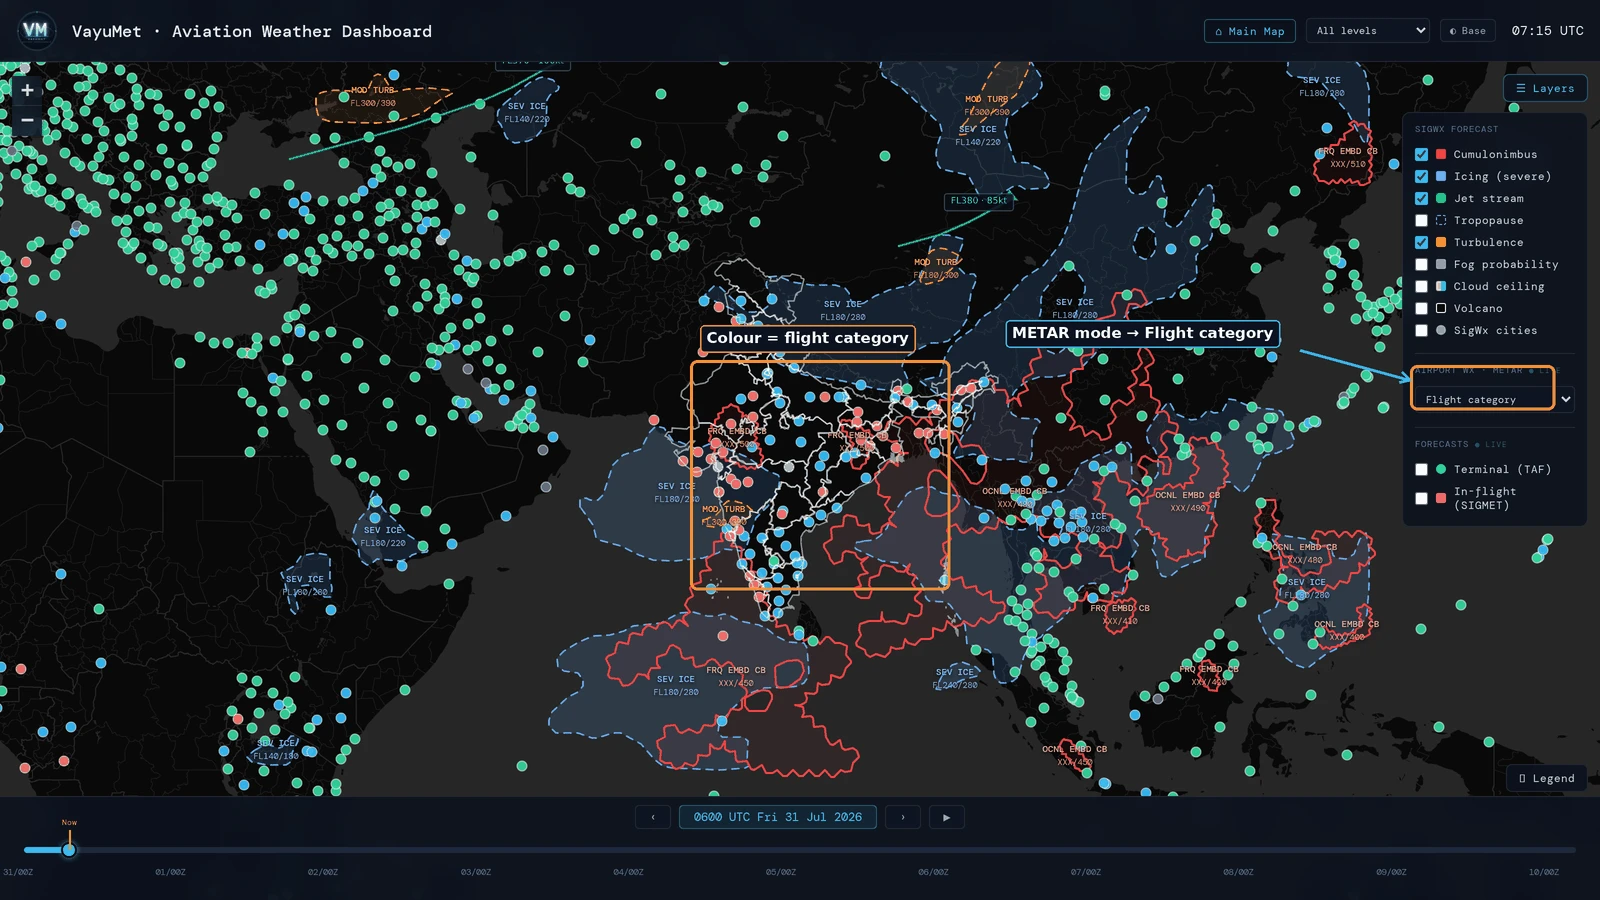
- Open the Aviation Dashboard
Expand the ✈ Aviation-SigWx Dashboard group in the panel and follow its link, or go straight to the dashboard.
- Start with flight category
METAR Flight Cat colours each station by current conditions; TAF Flight Cat does the same for the forecast.
- Click a station
Open a station to read its decoded report and, for TAF, a period-by-period forecast chart.
- Check hazards and ceilings
SIGMET Hazards shows affected airspace; Cloud Base AGL (ft) and Visibility METAR cover approach minima; Fog Probability flags fog risk.
| Category | Meaning | Ceiling / visibility |
|---|---|---|
| VFR | Visual flight rules | Ceiling above 3,000 ft and visibility above 5 sm |
| MVFR | Marginal VFR | Ceiling 1,000–3,000 ft or visibility 3–5 sm |
| IFR | Instrument flight rules | Ceiling 500–1,000 ft or visibility 1–3 sm |
| LIFR | Low IFR | Ceiling below 500 ft or visibility below 1 sm |
VayuMet's aviation layers are situational-awareness aids. Always use official briefing sources and current authoritative METAR/TAF/SIGMET products for operational flight decisions.
4.4 Hazard alerts
Goal: see which districts face which hazard, day by day.
- Open the alerts map
Expand the 🚨 Alerts & Warnings group in the panel and follow its link, or go straight to the alerts map.
- Start with the composite
Composite Alert merges all hazards into one severity view — the fastest overall picture.
- Isolate a hazard
Switch to a specific alert to see only that threat.
- Step through the days
The timeline moves a day at a time across the alert period.
Precipitation
Heavy and very heavy rainfall likelihood at district level.
Thunderstorm
Convective activity with associated squall risk.
Gale Winds
Damaging sustained winds and gusts.
Dust Storm
Blowing dust — mainly pre-monsoon northwest India.
Heat Wave
Extreme high temperature episodes.
Cold Wave
Extreme low temperature and frost risk.
4.5 Seasonal outlook
Goal: understand the months ahead, not the days ahead.
- Open the seasonal forecast
Expand the 📅 Seasonal Forecast group in the panel and follow its link, or go straight to the seasonal forecast.
- Choose anomaly or absolute
Anomaly layers show departure from normal. Forecast layers show the predicted value itself.
- Step by month
The timeline advances one month per step across the outlook period.
- Click a district
Opens a month-by-month chart for that district so you can see the shape of the season.
Treat these as guidance on the likely tendency of a season, not as a prediction of any particular day. Confidence falls as the lead time grows.
For monsoon performance against actuals, the Monsoon 2026 Monitor compares forecast rainfall with observed rainfall to date on a side-by-side swipe map.
4.6 Air quality and visibility
Goal: assess haze, particulate load and fog risk.
| Layer | Unit | Notes |
|---|---|---|
| PM2.5 | µg/m³ | Fine particulates — the main health-relevant pollutant. |
| PM10 | µg/m³ | Coarse particulates, elevated during dust events. |
| AOD 550nm | index | Total column aerosol loading. |
| Dust AOD 550nm | index | Dust-specific component of aerosol loading. |
| Visibility (AOD/IGP) | m | Experimental — derived visibility from aerosol depth and humidity. |
| Visibility (PM/Kosch.) | m | Experimental — derived visibility from PM2.5 extinction. |
Both visibility products are model-derived estimates, not observations. Cross-check against Visibility METAR at a nearby airport before relying on them.
4.7 Satellite and live observations
Goal: see what is actually happening right now, not what is forecast.
- Enable satellite imagery
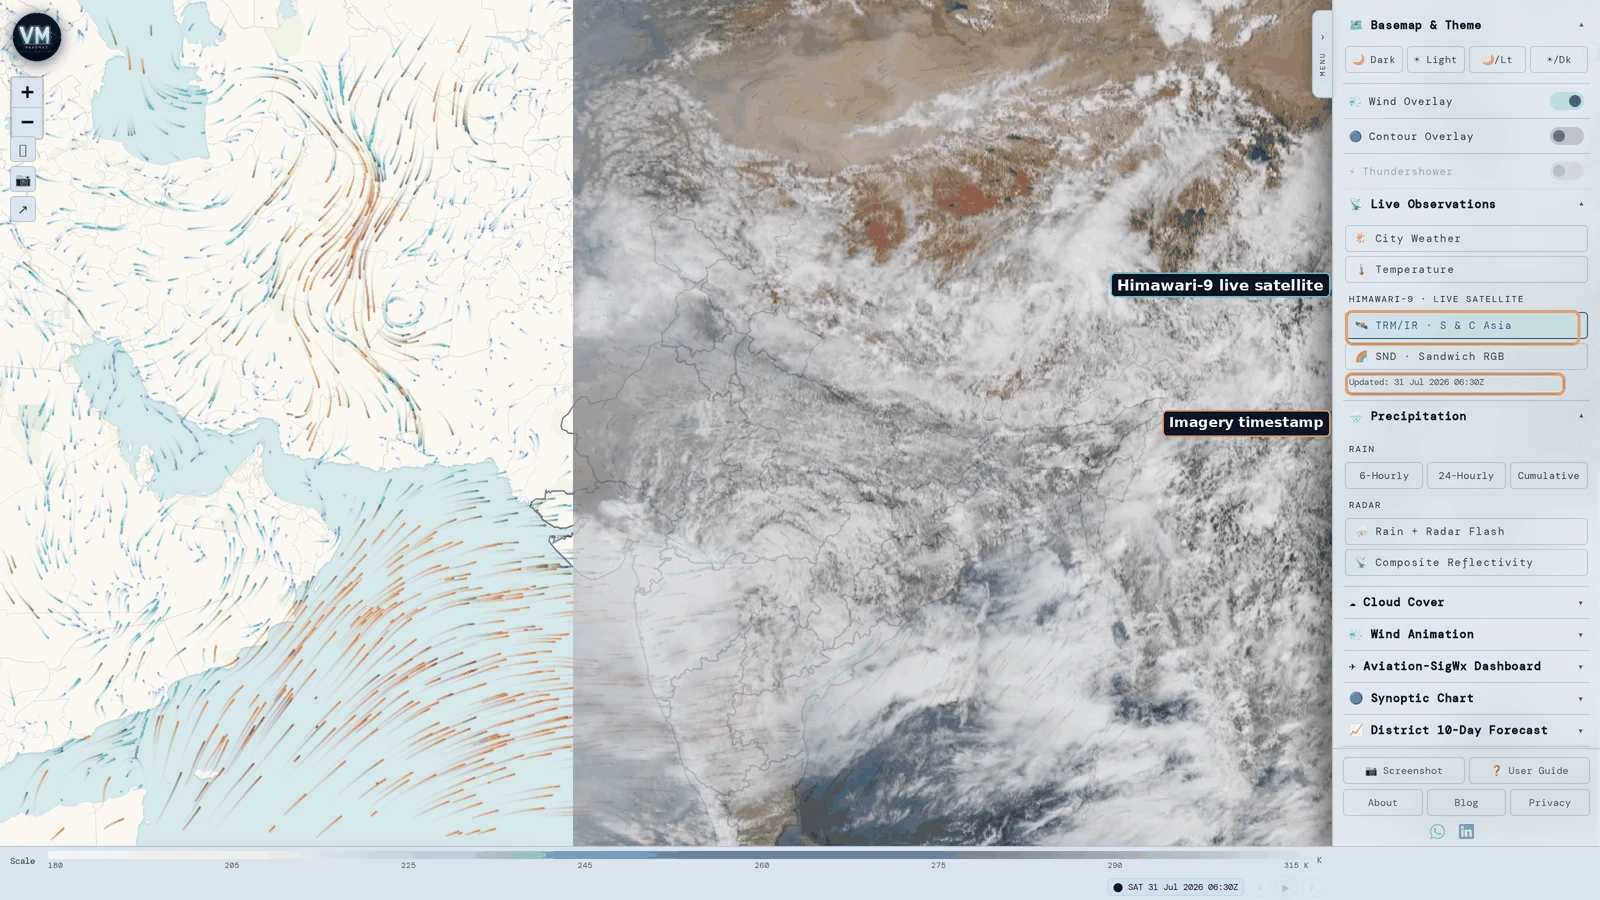
Choose Himawari-9 TRM/B13 for infrared cloud-top temperature, or Himawari-9 SND for the sandwich IR/RGB product.
- Check the status badge
Where the frame time normally sits, the timeline shows
⬤ SATfollowed by the imagery timestamp, for example⬤ SAT 31 Jul 2026 06:30Z. The panel repeats it as Updated:. Error states are covered in section 6. - Add station reports
Turn on 📡 Live Observations for Wx Icons (METAR) and Temperature (METAR) at reporting stations.
- Compare with the forecast
Switch between satellite and forecast rainfall for the same time to judge how well the model is tracking reality.
4.8 Standalone tools
Several features are separate focused pages rather than layers on the main map. Each is reachable from its named group in the control panel, and from the links below.
Rain Futures Index Desk
Live NCDEX RAINMUMBAI and RAINCHNNAI rainfall indices with 14-day VM-AIFS and VM-IFS projections. See section 4.9.
VIMI Monsoon Index
The seven-component VayuMet Indian Monsoon Index and its scientific paper. See section 4.10.
Aviation Dashboard
SigWx chart, METAR/TAF/SIGMET, icing, turbulence, fog and ceiling in one dashboard.
Synoptic Chart
Sea level pressure, wind barbs from 10 m to 200 hPa, temperature, humidity, tendencies and CAPE/CIN.
District 10-Day Forecast
Time-series meteogram for a single district, with impact-based advisories for four sectors. See section 4.11.
Monsoon 2026 Monitor
Forecast versus actual monsoon rainfall as departure categories.
District Climatology
Long-term normals and the 1951–2025 district warming analysis.
Rainfall Forecast
6-hourly, 24-hourly, cumulative rainfall and radar reflectivity.
Cloud Cover Forecast
Low, mid, high, total and convective cloud fraction, plus ceiling height.
Air Quality Forecast
PM2.5, PM10, AOD, dust AOD and two experimental visibility methods.
Renewable Energy Forecast
Solar radiation, wind power potential at 100 m and sunshine duration.
Live Weather Observations
Real-time METAR city weather and Himawari-9 satellite imagery.
Wind Forecast
Animated wind from 10 m surface to 200 hPa jet stream level.
Agriculture Weather Forecast
Soil moisture and soil temperature at 0–10cm depth.
State Forecasts
Plain-language forecast summaries for 15 states.
Blog
Written analysis of active systems and notable weather events.
4.9 Rain Futures index desk
Goal: see where an exchange-traded rainfall index has been, and where two independent models say it is heading.
NCDEX lists India's first exchange-traded weather derivatives. RAINMUMBAI tracks the southwest monsoon over Mumbai from 1 June to 30 September; RAINCHNNAI tracks the northeast monsoon over Chennai from 1 September to 31 December. Each settles on a running Cumulative Deviation Rainfall (CDR) number: the index opens the season at that city's seasonal normal — 2,206.7 mm for Mumbai, 998.25 mm for Chennai — then each day adds the rainfall actually recorded at its two IMD observatories and subtracts the normal for that date. Rising means wetter than normal, falling means drier. One millimetre is worth Rs 50 per lot on both contracts.
The Rain Futures Index Desk is a standalone page — it is not a map layer. It reproduces the official published spot and runs it forward 14 days.
- Read the header strip
Each panel opens with the official spot in millimetres and its rupee value per lot, the departure from the season anchor, the model spread at the end of the projection window, and where the season currently ranks against previous seasons on the same date.
- Follow the solid line
That is the CDR spot as NCDEX publishes it — observed, not forecast. The shaded band behind it is the same index over its published back-computed seasons, 10th to 90th percentile, with the median as a dashed grey line.
- Read the two dashed lines
VM-AIFS is ECMWF's machine-learning model; VM-IFS is ECMWF's physics model. Both start from the latest published spot. They are separate models, not two members of one.
- Use the gap as your uncertainty
The Gap column in the table under each chart is the distance between the two projections. Where they diverge, that divergence is the honest uncertainty on the call.
- Check the verification table
Below both panels, yesterday's projections are scored against what the exchange actually published, by city, by model and by lead day. Nothing is hidden when it misses.
Their anchors differ by more than a factor of two, and so does how far each typically travels in a season. A shared scale would flatten one panel and mislead on both, so each keeps its own.
These projections carry no bias correction — out of fold, every correction tested scored worse than leaving the model alone. Both models under-forecast heavy rain, so treat any active spell in these trajectories as a lower bound, and treat the model gap as wider than either model's own error statistics imply.
VayuMet is not affiliated with NCDEX. The projections on this page are VayuMet's own meteorological analysis, not official settlement values and not a forecast of any contract price. Nothing here is investment, trading or financial advice. Both contracts settle on just two rain gauges per city, so an index can diverge sharply from rainfall a short distance away — that basis risk is inherent to the contracts. Verify all contract terms on ncdex.com and consult a registered adviser before trading.
4.10 VIMI monsoon index
Goal: know whether the monsoon is about to go active or break, and why.
Most monsoon diagnostics measure an ocean signal that influences the monsoon. The VayuMet Indian Monsoon Index (VIMI) measures the monsoon itself. It is a seven-component weighted index built on the semi-permanent circulation features that constitute the Indian summer monsoon, computed on GFS output to 16 days.
| Component | What it measures |
|---|---|
| Monsoon trough | Position and intensity of the seasonal low-pressure axis across the Indo-Gangetic plain. |
| Somali low-level jet | Cross-equatorial moisture transport into the Arabian Sea. |
| Tibetan anticyclone | Upper-level warm high over the plateau that anchors the whole circulation. |
| Tropical easterly jet | Upper-level easterly outflow south of the anticyclone. |
| Heat low | Thermal low over northwest India and Pakistan. |
| Mascarene high | Southern-hemisphere source high driving the cross-equatorial flow. |
| Bay of Bengal flow | Moisture feed on the eastern arm of the monsoon. |
- Read the composite index
A single value combining all seven components. High means a strong, well-organised monsoon circulation; low means a weakening or broken one.
- Read the forward curve
The index is projected on GFS output to 16 days, so a turn in the curve is an early signal of an approaching active or break spell.
- Break it into components
When the index moves, the component breakdown shows which feature moved it — a collapsing low-level jet and a weakening trough mean different things for where rain will fall.
- Read the paper for the method
The full derivation, weighting and verification are in the VIMI scientific paper (PDF).
Across JJAS 2009, 2018, 2019 and 2023, VIMI carries 72% skill on active/break spell identification and 81% accuracy on the direction of monthly rainfall departure.
VIMI describes the strength and phase of the monsoon circulation. Rainfall follows circulation imperfectly, particularly at district scale and over orography. Pair it with section 4.1 for where the rain actually lands.
4.11 Impact-based advisories
Goal: stop reading a forecast and start acting on one.
A conventional warning tells you the weather: heavy rain, orange, 15–17 July. It does not tell you what that rain will do to you — and the answer is completely different for a district officer, a farmer with a standing crop, a dispatcher planning fuel, and a wind-farm operator. VayuMet takes the extra step: every district forecast carries advisories that name the consequence, the recommended action and the exact dates affected.
They appear in two places, and both are driven by the same rules:
- On the district forecast page
Open the District 10-Day Forecast, pick a district, then use the four tabs at the top — Weather, Agriculture, Aviation, Energy. Each tab redraws the charts for that sector and swaps the advisory card beneath them.
- On the main map
Click a district to open the meteogram tray. The advisory column is the final column, spanning every row — the same guidance without leaving the map.
- Read the dot colour first
Each bullet is dotted in its IMD warning tier — red for severe or extreme, orange for warning, yellow for watch, green for all-clear, blue and grey for information. Scan the colours before the words.
- Read the dates, not just the hazard
Dates are collapsed into readable ranges — 15–17 Jul, 20 Jul — so you can plan around the specific days rather than the whole period.
- Print or export it
The forecast page has 🖨 Print and ⬇ PNG buttons, so an advisory can go straight into a briefing pack or a field bulletin.
What each sector tab tells you
| Tab | Built from | What it advises on |
|---|---|---|
| Weather (public & tourism) | Temperature and feels-like, rain, wind, weather type | Waterlogging and travel buffers in heavy rain; heat-wave exposure hours; when to move indoors for thunderstorms; risk to high-profile vehicles, hoardings and boating in gusty winds; fog delays to flights and trains. |
| Agriculture | Spray window, ETo, soil moisture, soil temperature | Which days suit spraying and which risk drift or washout; whether the sowing window is open on seed-zone moisture and temperature; irrigation need from the rain-versus-ETo balance; leaf-wetness spells that raise fungal-disease pressure; lodging risk to standing crops and orchards. |
| Aviation | Flight category, ceilings, icing, turbulence, CB | IFR and LIFR periods with a prompt to plan alternates and fuel; embedded CB with cloud tops and convective SIGMET conditions; icing severity with its flight-level band and the freezing level; turbulence band; fog risk around sunrise. |
| Energy | Solar GHI and PV, 100 m wind, power density | Low-yield days that suit plant maintenance; strong solar days in MJ/m²/day; cell-temperature derating on hot afternoons; sustained generation hours in the full-power band; storm cut-out risk and steep ramp events; wind lulls below cut-in. |
The thresholds live in a single shared rule file, so the map tray and the forecast page can never disagree. The rules follow published IMD warning criteria, ICAO meteorological practice and GKMS-style agromet guidance — they are not invented for this site.
An advisory translates a district-scale forecast through general thresholds. It cannot see your field's drainage, your aerodrome's local effects or your plant's equipment, and it inherits every limitation of the forecast behind it. Treat it as informed guidance to check against local knowledge, not as an instruction.
The aviation card is advisory only and carries this notice on every district. For flight operations use current METAR, TAF and SIGMET from the aerodrome meteorological office, as required under ICAO Annex 3.
▚ End module 4 — core features
05 Advanced Options
Customising the display, getting views out of the platform, and where the data comes from.
5.1 Customisation settings
| Setting | Where | Persists? |
|---|---|---|
| Light / dark theme | Theme button | Yes — stored in your browser |
| Basemap combination | Panel, basemap row | No — resets on reload |
| Overlay toggles | Panel, toggle group | No — resets on reload |
| Active layer | Panel, layer groups | No — resets to default |
| Fullscreen | ⛶ button | No |
A practical combination for monsoon watching: Total Rain · 6h as the base layer, 💨 Wind Overlay on to show the flow feeding it, and 🔵 Contour Overlay on to locate the low or trough driving it — all three readable at once.
5.2 Sharing and export
- Share a link
Press ↗. On mobile this opens the system share sheet; on desktop the page URL is copied to your clipboard with an on-screen confirmation.
- Save an image or PDF
Press 📷, then use your browser's Print → Save as PDF to capture the current view.
- Present fullscreen
Press ⛶ to remove browser chrome for meetings and briefings.
You are welcome to use VayuMet screenshots in reports and presentations. Please credit VayuMet Weather — vayumetweather.com and note the frame time shown on the timeline.
5.3 Integrations and data sources
VayuMet integrates several external data streams. Understanding which model sits behind a layer tells you how much to trust it and how often it refreshes.
| Source | Feeds | Resolution | Update |
|---|---|---|---|
| NOAA GFS | Rain, wind, temperature, cloud, pressure, soil, CAPE/CIN, alerts | 0.25° (~25 km) | 4× daily |
| NCEP CFSv2 | Seasonal anomaly and forecast outlooks | District aggregate | Monthly |
| Aviation Weather Center | METAR, TAF, SIGMET, significant weather | Station / airspace | Real time |
| ECMWF-CAMS | PM2.5, PM10, AOD, dust AOD | 0.25° | Daily |
| JMA Himawari-9 | Live satellite imagery | Satellite native | Continuous |
| IMD | Observed rainfall for monsoon comparison, climatology baselines | District | Periodic |
| ECMWF IFS-HRES | VM-IFS rainfall-index projection (section 4.9) | 0.25° | Daily |
| ECMWF AIFS | VM-AIFS rainfall-index projection (section 4.9) | 0.25° | Daily |
| NCDEX public disclosures | Official RAINMUMBAI and RAINCHNNAI spot, LPA and futures prints | Contract / city | Daily, 09:15 IST |
| NOAA PSL | Climatology and reanalysis baselines for wind, cloud and temperature | ~0.5° to ~2° | Periodic |
Comments on articles
Blog articles use giscus, which threads discussion through GitHub. Reading comments requires nothing; posting one requires a free GitHub account and is the only place on VayuMet where any sign-in exists — it belongs to GitHub, not to us.
There is currently no public API or data-download endpoint for programmatic access. If you need bulk or automated access for research, contact us at contact@vayumetweather.com.
▚ End module 5 — advanced options
06 Troubleshooting & FAQs
What the on-screen messages mean, and what to do about them.
Common messages and fixes
| What you see | Meaning | What to do |
|---|---|---|
| No data | That layer has no value at this point or frame — often normal (no rain means no rain). | Step to another frame or zoom out. If every frame is empty, the layer has not been produced for this run. |
| No data yet — run pipeline first | The layer exists but its data has not been generated for the current run. | Wait for the next scheduled run. If it persists across runs, report it. |
| ⬤ SATELLITE — no data yet | Satellite imagery for the current slot has not arrived. | Wait a few minutes and reload — imagery updates continuously. |
| ⬤ SATELLITE — unavailable | The upstream satellite feed cannot be reached. | Use forecast layers meanwhile; this normally resolves on its own. |
| (partial) | The layer loaded but some frames or regions are missing. | Treat gaps as missing, not as zero values. |
| Failed to initialise SigWx chart | The significant-weather chart could not load. | Reload the page. If it repeats, other aviation layers still work normally. |
Frequently asked questions
The map is blank or stuck loading.
Hard-reload the page (Ctrl+Shift+R, or Cmd+Shift+R on Mac). Confirm JavaScript is enabled and that an ad blocker is not blocking map tiles. First load of a layer is always slower because rasters are decoded in your browser.
The data looks older than it should.
The model run time is not shown on the map — only the valid time of the frame you are viewing. Runs publish four times daily and take time to process, so several hours of lag between real time and the newest frame is normal. If the earliest frame is more than a day behind today, hard-reload to clear a cached copy.
Why do the forecast times not match my clock?
All forecast times are UTC. Indian Standard Time is UTC + 5:30 — so 06:00 UTC is 11:30 IST.
Two rainfall layers disagree.
They almost certainly use different accumulation windows. Re-read the callout in section 3.3 — 6-hourly, daily and cumulative totals are not comparable to each other.
Labels are unreadable over a bright layer.
Change the basemap combination (section 3.2). The mixed options exist precisely for this — they let you flip label colour independently of the tiles.
It does not work well on my phone.
The map works on mobile, but layer-heavy views are demanding. Close the panel after choosing a layer, turn off overlays you are not using, and prefer the district meteogram or a state forecast page for a quick answer on a small screen.
Can I download the underlying data?
Not directly today — see section 5.3.
The Rain Futures projection does not match the futures price I see on my terminal.
It is not meant to. The desk projects the rainfall index (the CDR spot), not the traded price of any contract. The futures table on that page also carries a footnote worth reading: the exchange's daily series publishes one value per calendar day and releases the current day's only once it settles, so those prints can predate the live spot shown above them. Section 4.9 has the full explanation.
Where do the advisories on the forecast page come from?
They are generated from that district's own meteogram by a shared rule set based on IMD warning criteria, ICAO practice and agromet guidance — not written by hand per district, and not a generic national bulletin. Section 4.11 explains what each sector tab covers.
The advisory says spraying is favourable but it looks windy outside.
The advisory is built on the forecast, not on current conditions, and it works at district scale. Local wind at your field can differ from the district value. Check section 4.11's caveat and use the live observations in section 4.7 for what is happening right now.
Why do VM-AIFS and VM-IFS disagree?
Because they are genuinely different models — one machine-learning, one physics — and that disagreement is the point. The Gap column is published as the honest uncertainty on the call. See section 4.9.
VIMI says the monsoon is active but my district is dry.
VIMI is a circulation index for the monsoon as a system, not a district rainfall forecast. A strong circulation still leaves rain-shadow and orographically sheltered districts dry. Use section 4.1 for where rain actually lands.
Contact and support
Enquiries and forecast feedback
About the platform
About VayuMet — background, methods and the team.
Privacy
Privacy policy — what we do and do not collect.
When reporting a problem, please include the page URL, the frame time shown on the timeline, the layer you had selected, and your browser and device. That is usually enough to reproduce it.
VayuMet is an informational service built on public numerical weather prediction data. For life-safety decisions and official warnings, always follow the India Meteorological Department and your local disaster management authority.
▚ End module 6 — troubleshooting
07 Versioning & Updates
How this document is structured so it can be maintained without rewriting it.
Each numbered section is a self-contained <section class="module"> block, opened by a banner comment and closed by an end-of-module marker. A section can be replaced wholesale without touching any other, because no section depends on content defined in another.
How to update a section
- Locate the module
Find the banner comment naming the module, for example
MODULE 4 — CORE FEATURES. - Replace between the markers
Edit or swap everything between the banner and the matching
▚ End moduleline. Leave surrounding modules untouched. - Update the contents list
The sidebar is the only cross-reference — mirror any added, removed or renamed section there.
- Verify layer names
Feature names in section 4 must match the
labelfields injs/config.jsexactly, so the guide and the interface always agree. - Record the change
Add a row to the revision history below and update the revision number in the masthead and sidebar footer.
Maintenance checklist
| When this changes | Update |
|---|---|
| A layer is added, renamed or removed | Section 4 tables and the relevant walkthrough |
| UI chrome or controls change | Section 3, plus affected screenshots |
| A new standalone page ships | Section 4.8 and sitemap.xml |
| A data source changes | Section 5.3 table |
| A contract, index or index methodology changes | Section 4.9 and the 5.3 table |
An advisory threshold or rule changes in js/advisory-rules.js | Section 4.11 sector table |
| A new error message is introduced | Section 6 message table |
| Accounts or an API are introduced | Section 2 (replace the no-login note) and section 5.3 |
Screenshot placeholders
Placeholder frames mark every image this guide should carry. Each names its target file under
/guide-img/ and states what to capture and annotate.
Every placeholder already contains a real <img> pointing at its target
path. Save your screenshot at exactly that path and it appears on the next reload — the
placeholder hides itself automatically. A file that is absent or misnamed simply leaves the
placeholder showing, with no broken-image icon.
The filename must match exactly, including the extension. A file saved as
2-1-landing.png.jpeg will not be found by 2-1-landing.png.
The only reason to edit the markup is to revise the alt text, which should describe
what the screenshot shows for readers using a screen reader.
| Section | File | Subject |
|---|---|---|
| 2.1 | 2-1-landing.png | Home page on first load |
| 3.1 | 3-1-anatomy.png | Annotated screen regions |
| 3.2 | 3-2-panel.png | Control panel detail |
| 4.1 | 4-1-rainfall.png | Rainfall layer with legend |
| 4.3 | 4-3-aviation.png | Aviation dashboard and station popup |
| 4.7 | 4-7-satellite.png | Himawari-9 imagery with status badge |
Revision history
| Revision | Date | Change |
|---|---|---|
| 1.4 | 15 Sep 2026 | Added a "Start here" block under the title: the three most common first actions (district forecast, district warnings, district climate) linked straight to the live tools, plus one-click links by field. |
| 1.3 | 4 Sep 2026 | Documented the impact-based advisory layer, previously undocumented: new section 4.11 covering both surfaces (forecast-page tabs and main-map tray), the four sector bundles and their sources, the IMD tier colouring, and the rule-based and aviation caveats. Two FAQ entries and a maintenance row added; sections 1 and 4.8 updated to point at it. |
| 1.2 | 4 Sep 2026 | Added section 4.9 (Rain Futures index desk — NCDEX RAINMUMBAI and RAINCHNNAI with VM-AIFS and VM-IFS projections) and section 4.10 (VIMI monsoon index). Added both pages to the 4.8 tool list, two audience cards to section 1, ECMWF IFS/AIFS, NCDEX and NOAA PSL rows to the 5.3 source table, and four FAQ entries. |
| 1.1 | 31 Jul 2026 | All six screenshots captured from the live site and annotated. Corrected section 3 against the real interface: there is no header bar, the logo opens this guide, there are three overlay toggles (not five), and the model run time is not displayed anywhere on the map. |
| 1.0 | 31 Jul 2026 | New guide written from the shipped feature set. Modular structure, numbered sections, screenshot placeholders. |
▚ End module 7 — versioning